Domain is simply the web URL of a website such as atishranjan.com is the domain for this blog. Domains should be added into your hosting account in order to use them. When you buy hosting, you have to set a primary domain and later when you add more domains in the same hosting, they are called as addon domains.
I am going to show you how you can add an addon domain in your bluehost hosting account however the steps are almost same with all the hosting providers which use Cpanel but this tutorial is based on bluehost. (If you are yet to buy hosting then buy it here and Get a free domain)
Adding an addon domain is very easy task which I am sharing step by step with proper screenshots. Ok so let’s go through the steps to know how to do it:
Log into your hosting account at bluehost
Open bluehost.com and click on login, you will see this screen. Enter your login credentials and hit on Submit button. It will take you to the hosting dashboard.

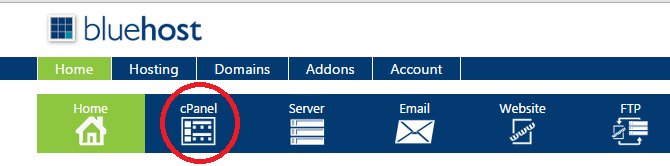
Open Cpanel
The next step is to click on Cpanel to see all the tools and options available in the control panel. You can do it by clicking “cpanel” menu item.
As long as you click you will see a lot of options out there on the page.
Find Addon domain and open it
Make use of CTRL+F to find “addon domain” and click to open it.

Here follows the steps:
Step 1: Assign or Add Domain
In the very first step, you need to enter the domain you want to add. As it is the first time you are adding a particular domain so use the option “Use a domain that is not already associated with your account” and enter the domain name without www in the text box.

Step 2: Verify Ownership
As you entered the domain name, the verification of domain process starts automatically, if the domain’s name server is already set to bluehost’s nameservers then it will be verified otherwise it will show options like this:
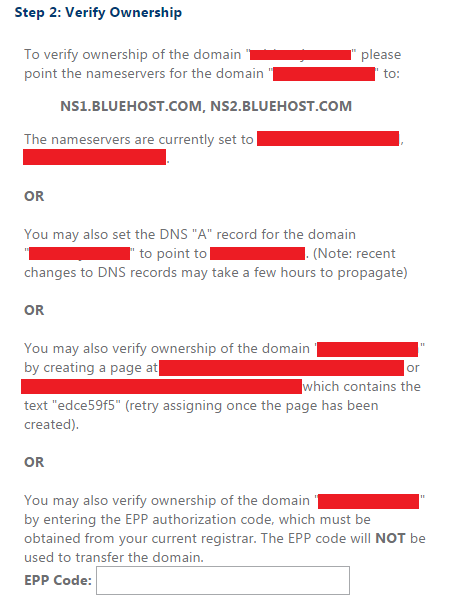
You just need to use any option to verify ownership, I prefer the first option. Just copy the nameservers of bluehost which are NS1.BLUEHOST.COM and NS2.BLUEHOST.COM and go to your domain control panel and update the nameservers then again repeat the verification process and it will show ownership verified.
Note: If the domain is registered with bluehost then there is no need of updating nameserver as its already pointed to bluehost.
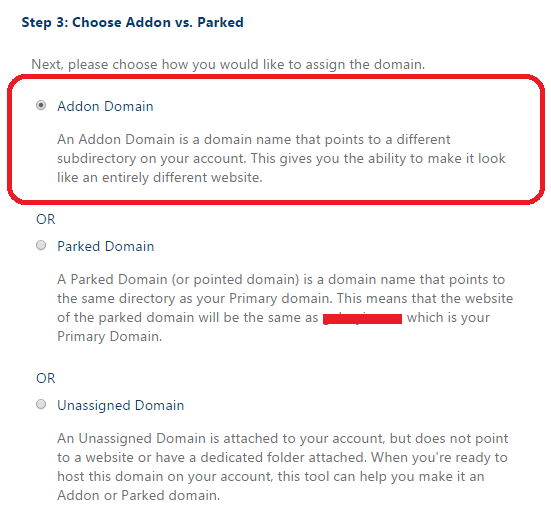
Step 3: Choose Addon vs Parked
The Third step is to choose either the option addon domain, parked domain or unassigned domain. As you are adding this as addon domain so choose Addon Domain option.
Step 4: Create Directory for Addon Domain
The fourth step is to create the directory for the addon domain your are adding. Tick the option create a new directory and enter whatever directory name you want to create but adding domain name as the directory name itself is the better idea.

One more thing, when you create a directory, there is a sub domain also created for the same. This is required for cPanel.
Lets understand it with an example, If your addon domain is example.com and you are creating a directory example then the subdomain created will be example.primarydomain.com(Primary domain is the domain which you have added to your account at the time of buying hosting account).
Note: It is a better idea to redirect this subdomain to the addon domain which you can do by going to option “Subdomains” where you can see the addon domain and subdomain listed. There you will find an option to redirect it, use that option and create the redirect.
That’s it! Now you can login to your ftp account using any FTP client like filezilla or cute FTP and locate to the directory you have created for this addon domain. Now, upload your website files within that directory. Now your site is ready to be exposed in front of your audience.
Hope you liked this how to guide for adding an addon domain into bluehost control panel.


Hi Atish bro,
This is good post specially for starters who got stucked on basic thing even with adding domain name to cpanel. This will really help newbies. Good one.
Keep it up.
Thanks
~Avinash
Yes, it is basic but good for newbies. Thanks for coming by.
Hi Atish,
Another awesome post. Even someone that is new to domain technical issue could easily follow your explanation to get his/her addon domain added to the hosting plan.
aceclue recently posted…Common Blogging Problems Demystified
Thanks for coming by Aceclue.
Very nice tutorial on a great subject. I love the guides with proper screenshots and good explanation. You have done a wonderful job while creating this piece of writing. Keep it up.
Thanks for liking my post Mark. Keep visiting my blog.
Hello Atish,
This is a beautiful piece and something most newbie bloggers will be very much be grateful for.
Thanks and please do have a great day.
Emmanuel recently posted…Some Bloggers I have Grown to Hate
Thanks for sharing your comment Emmanuel! Keep visiting.
Hi Atish,
This is indeed a new thing to me,
Since I am new at wp i need to learn a lot on this line
Thank you so much for this wonderful tutorial
May you have a wonderful weekend too!
Good day
~ phil
Philip Verghese Ariel recently posted…Why Should Bloggers Read A Lot? A Guest Post By Atish Ranjan
Thank you so much for reading my post Philip. I am glad that you learnt something from this particular blog post. Keep visiting.
Hi Atish, I’m a big Blue Host fan and you’ve done a great job of explaining this clearly. I wish I had this when I first started The Wonder of Tech!
I have both wonderoftech.com and thewonderoftech.com just to be sure that readers can find my site. It took a long time to figure out how to add a domain to my account. If only I had your clear explanation then!
I will be sharing this so others can benefit from this very helpful post!
Carolyn Nicander Mohr recently posted…17 Handy (and Cool) iMessage Tips and Tricks!
You made my day Carolyn! I was not in blogging even when Wonderoftech was started :P. I am glad you loved the post which is my target. Keep coming to my blog and share your valuable feedback.
Thanks a lot Atish Bro for detailed Guide, For newbie bloggers, Adding extra domains to multi-domain hosting is a time consuming task and maximum of new bloggers are confused between parked & addon Domains, But your guide have cleared all the doubts..
Thanks for it again, You have guided in very clean and step by step manner..
Nice blog Bro..! Keep it up 🙂
Aliakbar recently posted…Long tail pro 3.0 Discount coupon 2016- $297/Yearr
Glad you liked the guide, Ali. Visit often.
Thanks for the tutorial Atish, many do not dare to change things in there since it can do a great damage.
great post….i already have a domain in bluehost and would love to add an add-on domain using this post…thanks for sharing
Is this facility available on Hostgator or any other hosting provider?
Hello Yogesh,
Yes, it is available. In fact, all the hosting providers which offer cPanel has this functionality in the same way.